|
Third Party Service Record Type - is used to record and process work done when an agency is acting as the third party to someone else on a regular, recurring basis such as providing inspection and/or plan review. They can schedule and result inspections on this record – and also record plan review results/notes. They can also attach any electronic documents, as needed. This record type can also be used to charge third party fees for the work you’ve completed - which can then be invoiced and sent to the party/agency that received service, and ultimately initiate and post payment.
A help desk ticket request must be made to add and configure this record type for an agency. It requires some configuration for custom dropdowns (to be collected from the agency), potentially for fees (agency dependent), add of any other users participating in this process, and some other small functionality. Third Party Billing - is when an agency uses a third party (receives service from) where the billing for the service(s) provided is a percentage-based split of fees collected and with no conditions (is always split and not dependent on any other criteria). Example, we cannot accommodate third party billing if they only split fees when the permit is greater in value than $10000 or when it is charged hourly, etc. Distribution codes are assigned to every fee to determine if it’s split and how it’s split – these must be configured as per the agency’s agreement. This distribution is only a mechanism that feeds a dedicated report to be run monthly to assist in reconciling and ultimately paying the agency’s third party. This functionality also requires configuration at the fee code level and otherwise. Once implemented, this must also then be maintained with all fee updates thereafter - every active fee would then include a distribution code – up and until the agency is no longer using this split method. A help desk ticket request is also required configure this fee functionality – submit to [email protected].
0 Comments
Currently when a workflow task is assigned using the Supervisor action, it does not appear in the users task list on the Workflow tab of the MY TASK PAGE. In the next Accela upgrade, this will be fixed.
If your agency has already published their 2024 holiday schedule where you know the dates that no inspections will be performed, please send that to the ePermitting Team as soon as possible by emailing [email protected]. Our team can verify all dates are blocked out for the year so that no inspections can be scheduled on those dates that your office is closed.
Just as a reminder, there are two helpful reports that you can generate to view a list of dates that are already blocked out on your inspection calendars. The reports can be found under Building Reports > Audit > select either:
We’ve had a lot of questions recently about the Dashboard versus the My Tasks page in Accela. Here is some helpful information to help you decide which view/page is best for you.
Dashboard The Dashboard is the default landing/home page when you first login to Accela each day, it is the upper-most left icon in the blue. When the task cards/list is first displayed at login, it is not accurate – you must first apply a filter to it for the displayed items to be correct. The suggested filter to start with is ‘My Active Tasks’ or ‘My Active Tasks – All Modules’ – either of these specific filters will show you all of your assigned Workflow tasks for your preferred module or for all modules, depending on which you select. All system filters are available in the My Filters dropdown to be applied. Filter results/displayed task cards cannot be further sorted or exported in any way. There are some quick controls available on each task card type (three dots in upper right-hand corner of the card) that can be helpful for resulting inspections or assigning unassigned Workflow tasks. My Tasks My Tasks is a page available from Launchpad > All Pages, you can favorite it here to add it to Your Pages. This page contains all the exact same information as the Dashboard, but is organized into the four functional assignment areas in Accela – Workflow, Inspection, Document Review, and Activities. In this way, all of the displayed tasks are not commingled – and the available Filters for each of the four tabs are also specific to that assignment area. The Workflow tab includes only Workflow-related filters, the Inspection tab includes only Inspection-related filters, and so on. Once data is displayed on any given tab, the data/filter results can be further sorted (by Address, Record Type, Assigned To, Assigned Date, Due Date, Task Type, etc) by clicking the column header. The displayed data/filter results can also be exported to Excel and/or printed if needed. We tend to recommend the My Tasks page over the Dashboard, particularly for newer users as it is more organized into the different assignment areas as are the Filters for each area, requiring much less in-depth knowledge of the system and of the filters which can be very helpful. Also the added functionality of being able to sort and export can be much more efficient when processing the filter results for yourself or for your workgroup. You can set My Tasks as your custom landing/home page, if desired – so the Dashboard would no longer be displayed by default at login – to do this see the Setting a Customer Landing/Home Page in Accela article, article in this months January BLOG. Important Note! Although some user groups might have permissions to do so, never delete any items from the Dashboard or from the My Tasks page – doing so will actually delete these items (tasks/inspections/documents/activities) from the database and from your records. ePermitting has had only mixed success in restoring data that has been deleted in this way, so please be very aware that you aren’t just deleting ‘completed’ items from your task list, you are actually deleting them altogether! Unfortunately, we cannot cap inspections in the Oregon Model because the only way to cap inspections in Accela is to ‘weight’ each individual inspection type which is not likely something we could standardize across agencies. Additionally, there are many, varying factors that affect inspection loads each day: inspector certifications, drive time to inspections, staffing, and much, much more. Our best-practice recommendation for managing inspection load, is to do the following: Each afternoon, go into MY TASKS page > Inspections tab > run the ‘Tomorrow's Inspections’ filter:
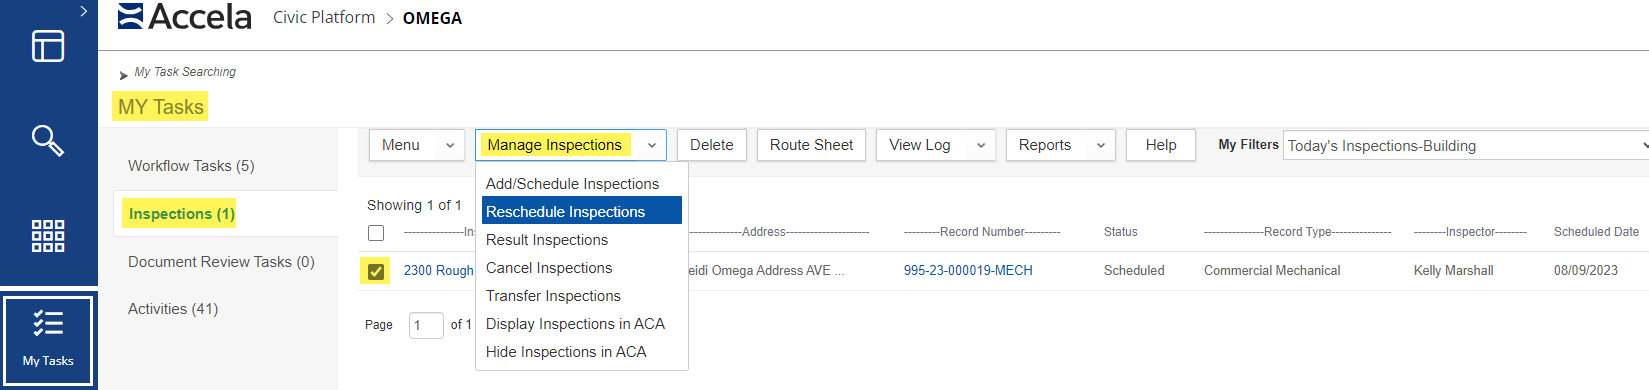
and determine then - a day ahead - if any inspections need to be rescheduled. If they do - PLEASE NOTE, rescheduling does NOT send any email or notification to the Requestor - you will have to reach out to customers to let them know their inspections are being rescheduled to whatever day you determine. You also have an available filter called ‘Inspections Scheduled in the Next Two Weeks’ if you wish to look ahead a little further - but note, new inspections are being scheduled every day - so if you look ahead too soon or too far, then it is very likely that additional new inspections will be scheduled regardless. If you are needing to actively Cancel (versus Rescheduling), then it is most ideal to click in to the individual inspection and actually result it as 'Cancelled' and then send the result email that generates in the back office. 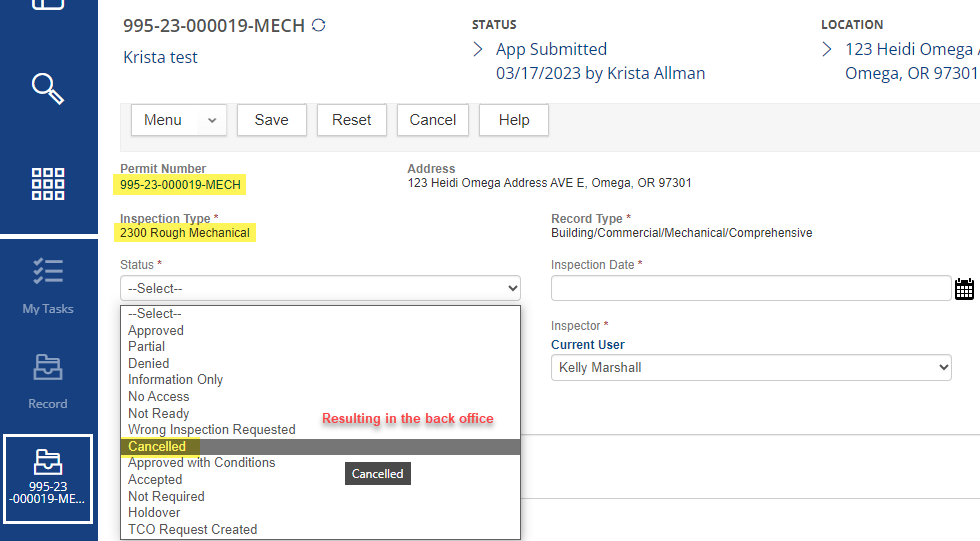 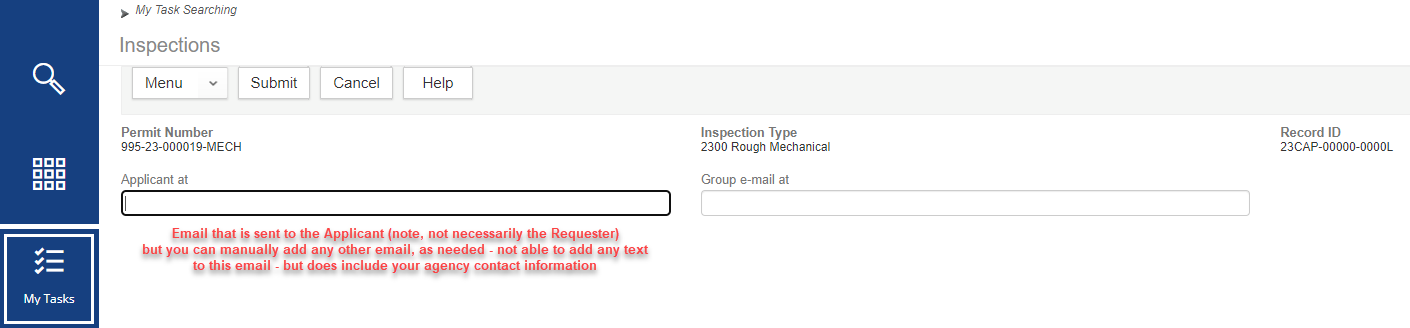 The only downside to this automated email you have the option to send in the back office, is that you cannot include any other text or information, it is a canned email - but does still state that the inspection has been cancelled and includes your agency's contact information. Alternatively, you have the option to checkbox the scheduled inspection - in MY TASKS > Inspections > Manage Inspections > Cancel Inspections from the list level (rather than the individual inspection level) - but this method does NOT send any notification or communication to the Requestor, so like rescheduling - you would have to specifically reach out to the requestor to let them know their inspection can't be completed as scheduled and is being cancelled (versus rescheduled for a different date).  Both of the above methods for cancelling inspections, result in a new pending instance of the cancelled inspection type for further/future scheduling.
When a customer requests – or your agency has too many inspections for the day – you have the option to RESCHEDULE a scheduled inspection. Once an inspection is rescheduled, NO email or notification is sent to the Requestor, so please consider this in your process – placing a call or sending an adhoc email from inside the record to notify the record contacts that the scheduled inspection has been rescheduled and include the reschedule details (reason, new date, etc).
 This new training document will walk the user through the collection of payment at Intake (versus at Issuance) and how to further process the application from there. Step-by-step instruction and screenshots are included to assist with this process.
Follow this link for more information: http://orepermittinghelp.kayako.com/Knowledgebase/Article/View/processing-plan-review-payments-intake Deciding how to review and permit for structures with 3 or more units can be complicated - in this new training document you will be provided with code-driven direction on making the distinction between these structure types and then how to review and permit for them.
Follow link to full article: http://orepermittinghelp.kayako.com/Knowledgebase/Article/View/defining-and-permitting-townhouses-and-multifamily-structures Auto-assignment of inspections by discipline can help organize your jurisdiction’s daily inspection load. We recommend that each discipline is assigned to only one single inspector as the ‘lead’ or primary for that discipline (inspectors can, however, be assigned more than one discipline).This is because if you have 2 or more inspectors assigned to a discipline, Accela will simply “share” out the inspections without paying attention to whether or not inspections are on the same permit or at the same address; so, you could end up with one permit having two inspectors scheduled for inspections on the same day- not very efficient! Example, if Jim and Tom are both certified for Residential Electrical – we would recommend that you only add the Electrical (Residential) discipline as “primary” to either Jim OR Tom’s user profile. If both Jim and Tom’s users were set up with the Electrical (Residential) discipline, the system would simply alternate between them to assign incoming residential electrical inspections, with no reference to address or project. If Jim is set up as primary, then every morning he can assess the inspections and logically reassign some of them to Tom. User Disciplines as provided in the Model: 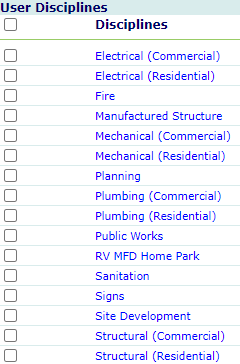 Auto-assignment helps save a lot of time and assures that the assigned inspector is certified to perform that type of inspection. It is important to keep track of your inspectors that have auto-assign disciplines set up. If an inspector leaves your agency, any of their assigned disciplines would need to be reassigned to minimize the disruption to your daily inspections.
Auto-assignment is also available by district. A district is a way to break down your jurisdiction into manageable parts for the purpose of inspection. District data would need to be provided in your APO load as parcel data in order to use this option. In this case, we could set up an inspector for a given district – as designated in your APO load (this can be added if you don’t already have this)- and they would be assigned all inspections with parcels that occur in their designated district. This option can be very helpful for counties where it could take hour(s) just to drive to one inspection. An inspection is assigned to the discipline associated to the large inspection group it belongs to. Because of this, sometimes the autoassigned inspection will need to be reassigned to another inspector. For instance, 1065 Sidewalk inspection has an designated discipline of Structural (Commercial) , however in some jurisdictions these are performed by a Public Works inspector. This inspection will be auto-assigned to the Structural (Commercial) inspector and would need to be reassigned to Public Works if that is who does the inspection. There are a small number of inspection types that have a similar conflict like this – if you are unsure, please submit a help ticket to inquire. If you would like to add/remove/change disciplines or districts on any of your inspector users, please submit a helpdesk ticket to [email protected] and fill out the Add/Remove user form found here: http://orepermittinghelp.kayako.com/Knowledgebase/Article/View/addingremoving-user-accountorepermittinghelp.kayako.com/Knowledgebase/Article/View/addingremoving-user-accounts. The Valuation (Calculator) tab provided on all building record types would be required in several business cases. The Valuation Calculator would be populated whenever occupancy would need to be granted – when there is new square footage being added (Type or Work = New, Addition), or when the permit is for a Tenant Improvement (Category of Construction = Tenant Improvement, Type of Work = Alteration). The Valuation Calculator tab values are used to populate the Certificate of Occupancy report where Occupancy and Type are requirements. Even if you are not using the Valuation Calculator to determine the fees in reference to valuation rules, the Certificate of Occupancy report still requires it be populated. Note, you are indicating which you are using for fees, Valuation Contractor or Valuation Calculator, using the Fee Calc Factor dropdown on the Fee tab. 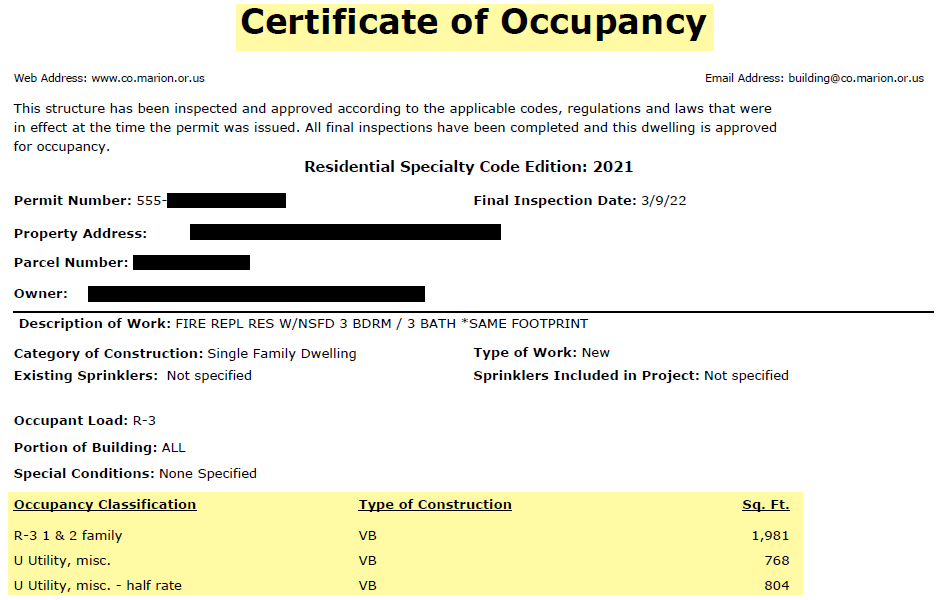 During the pandemic, there has been an increase in electronic plans being submitted online and reviewed electronically. Currently, in ePermitting, customers can upload plans on ACA but the electronic plan review and mark up is happening outside Accela in either Bluebeam or Adobe Acrobat Pro.
ePermitting is interested in providing some enhanced options:
You can set a custom landing/home page in Accela, rather than using the Dashboard view that is currently the default landing page in Accela.
To set a custom landing/home page, follow these quick steps (Important Note: these steps cannot be done while delegated in thru Oregon, favorites and home pages must be set directly by logging in to each individual agency):
We’ve had a lot of questions recently about the Dashboard versus the My Tasks page in Accela. Here is some helpful information to help you decide which view/page is best for you. Dashboard The Dashboard is the default landing/home page when you first login to Accela each day, it is the upper-most left icon in the blue. When the task cards/list is first displayed at login, it is not accurate – you must first apply a filter to it for the displayed items to be correct. The suggested filter to start with is ‘My Active Tasks’ or ‘My Active Tasks – All Modules’ – either of these specific filters will show you all of your assigned Workflow tasks for your preferred module or for all modules, depending on which you select. All system filters are available in the My Filters dropdown to be applied. Filter results/displayed task cards cannot be further sorted or exported in any way. There are some quick controls available on each task card type (three dots in upper right-hand corner of the card) that can be helpful for resulting inspections or assigning unassigned Workflow tasks. My Tasks My Tasks is a page available from Launchpad > All Pages, you can favorite it here to add it to Your Pages. This page contains all the exact same information as the Dashboard, but is organized into the four functional assignment areas in Accela – Workflow, Inspection, Document Review, and Activities. In this way, all of the displayed tasks are not commingled – and the available Filters for each of the four tabs are also specific to that assignment area. The Workflow tab includes only Workflow-related filters, the Inspection tab includes only Inspection-related filters, and so on. Once data is displayed on any given tab, the data/filter results can be further sorted (by Address, Record Type, Assigned To, Assigned Date, Due Date, Task Type, etc) by clicking the column header. The displayed data/filter results can also be exported to Excel and/or printed if needed. We tend to recommend the My Tasks page over the Dashboard, particularly for newer users as it is more organized into the different assignment areas as are the Filters for each area, requiring much less in-depth knowledge of the system and of the filters which can be very helpful. Also the added functionality of being able to sort and export can be much more efficient when processing the filter results for yourself or for your workgroup. You can set My Tasks as your custom landing/home page, if desired – so the Dashboard would no longer be displayed by default at login – to do this see the Setting a Customer Landing/Home Page in Accela article, article in this months January BLOG. Important Note! Although some user groups might have permissions to do so, never delete any items from the Dashboard or from the My Tasks page – doing so will actually delete these items (tasks/inspections/documents/activities) from the database and from your records. ePermitting has had only mixed success in restoring data that has been deleted in this way, so please be very aware that you aren’t just deleting ‘completed’ items from your task list, you are actually deleting them altogether! When you reschedule an inspection there is NOT an automated message that gets sent from Accela to let the customer know that the inspection has been rescheduled.
You need to let them know that you have rescheduled the inspection. Unfortunately, there isn’t an Accela option to send an automated email when you use the Reschedule function/button – We will suggest the ‘automated email at Reschedule option’ to Accela, because it certainly would be nice to have. For more information on Resulting inspections, see Resulting Inspections so your trips count. ePermitting has recently received a few help tickets from agencies needing to provide a discount or credit to an applicant – there is a way to do this in the system using the PAYMENT functionality.
Please take a moment and learn about this and other Exceptional ‘Payment’ Types thru our Kayako Knowledgebase! Common renovation activities like sanding, cutting and demolition can create hazardous lead dust and chips by disturbing lead-based paint, which can be harmful to adults and children. To protect against this risk, the Environmental Protection Agency (EPA) issued the Renovation, Repair and Painting Rule (RRP Rule) that became effective on April 22, 2010.
Oregon enforces federal regulations for contractors working on housing or child-occupied facilities built before 1978. For more information about licensing, visit the Oregon Construction Contractors Board. To read the rule, visit the Oregon Health Authority’s Lead-based Paint Program. First did you know that all records – permits, applications, and licenses have a unique identification code within their agency called the Record Id? The Record Id often appears in the extreme right hand column on the Building or Record List portlet.
The Record Id is used to link all of the components – like custom fields, owner, site address, parcel, inspections and work flow – to the record. In the data base each of these components represents a table. The Record Number exists in two places in the data base – the main table for the record (B1PERMIT) and the table that includes all the financial transactions for the record (ACCOUNTING_AUDIT_TRAIL) starting when fees are invoiced. Both tables have the Record Id as well. The table with the financial transactions copies the Record Number from the main table for records for each step in financial transactions. The Record Number can be modified on the ‘Description of Work/Copy Recs (Unrelated)’ portlet. When the Record Number is modified, the date the modification occurred can be found by using the ‘View Log’ button on the ‘Description of Work/Copy Recs (Unrelated)’ portlet. When reports are run, the report will show the Record Number as it existed at run time. This is not a problem unless a report was run that shows the original system generated Record Number and subsequent report was run that show the modified Record Number. The problems can be increased when report results end up as a documents attached to the record. It is possible to have documents with different Record Numbers attached to the same record. Reports include invoices, receipts, permits and applications as well as tabular reports like Permits Issued. To prevent these problems either never change the Record Number or only change the Record Number before invoicing fees and an application is printed. On Monday, Feb. 24, the Start_time (default 00:00:00) and End_time (default 23:59:59) parameters will now be shown when the Deposit Slip report is run. This change will allow the user to tailor the report to match the jurisdiction’s business-day cutoff times for making their physical bank deposit of cash and checks. We do not recommend using the Deposit Slip to reconcile credit card transactions as these are not actually part of the physical deposit. Additionally, when a customer pays fees with a credit card, the logic in ePermitting assumes the funds are present and can be applied to the fee item – this is not necessarily the case as the funds from a credit card transaction are not actually available to your jurisdiction until the credit card transaction is settled. Settling often does not coincide with the date/time of the credit card payment. Additionally the Deposit Slip report does not include the credit card authorization number which is needed to reconcile credit. It is best to use either the Payments Received by Method or Credit Card Detail reports to reconcile credit since again there is no actual deposit action associated to these transactions. An example on how to set the parameters when using the updated Deposit Slip report for a physical (money bag) deposit is displayed below. In this example, the office’s business day starts at 7:30 a.m. and ends at 4 p.m. Note the report uses a 24-hour clock for the time parameters. In this particular example, the jurisdiction does not have separate offices and all of the departments combine the money received into a single deposit and money bag – therefore, Office is set to ‘-All-‘ and Department is set to ‘-All-‘. Because the report should list only transactions that were paid with money that would be included in the physical money bag, only select ‘Cash’ and ‘Check’ for the Payment_Type – select CTRL while clicking more than one value in the dropdown list. The included screenshot shows the parameters for the daily deposit done at the end of business on January 28, 2020. Because cash and check payments could have been accepted after 4 pm end of business on Jan. 27, the report Start_date should be 01/27/2020 and the Start_time should be set to 16:00:01 (4:00:01 p.m.). The End_date should be 01/28/2020 and the End_time should be set to 16:00:00 (4:00:00 p.m.). Note that the Deposit_id is not saved in the database and only appears on the printed report. 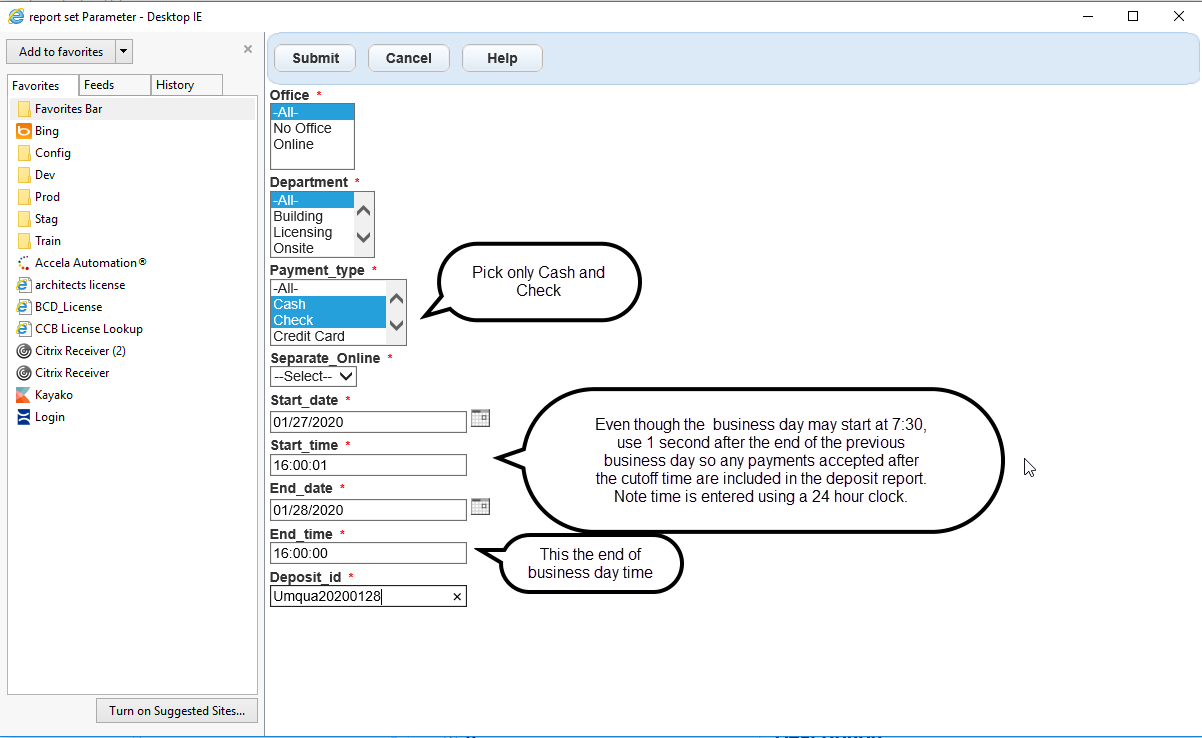 In the Accela system temporary parcels can be created by ePermitting staff or by the Agency directly, and can then be used for work being done where a permanent or numbered parcel is not applicable. Some examples of this, is for work being done in the Right-of-way, Code Enforcement cases where no parcel would apply such as transient, illegal camping, graffiti, etc, or the parcel is simply unknown at the time of application intake. A temp parcel could also be used to flag a record for tracking purposes of ‘assets’ such as bridges, statues/fountains, fire hydrants, bus stops, parklets, etc. More than one temporary parcel can be applied to a single record, i.e. a complaint included both Graffiti and Transient, both temp parcels could be associated. Using temp parcels gives agencies the ability to search by the temp parcel name and see a list of all records that are associated to said parcel – Reference Data: Parcel > Associated Record List.
It’s helpful to consider the purpose/use of the temp parcels created prior to creating them, so they can be named in a meaningful way, i.e. creating one temp parcel called ROW versus creating 3 temp parcels called ROW – UTILITIES, ROW – CONSTRUCTION, ROW – EVENT, etc., an agency could quickly and easily see how many records were in the differing types of right-of-way versus having to go thru a long list of all records associated to just a generically named temp parcel like ROW. Examples of Temporary Parcels Code Enforcement (Planning Investigation):
There is an issue trending where agencies are experiencing scheduling and auto-assign confusion and problems related to PW inspection types. There is an important distinction to be made between Public Works inspections provided in the PW Module and those provided in the Building Module.
The PW Module has the Public Works inspection group that provides a large number of very detailed and diverse public works inspection types, the 6000 series. The Building Module has the Building/Structural inspection group that provides only a small number of high-level public works inspection types, the 1000 series. Building Module > Building/Structural inspection group > offers 1050 Excavation, 1060 Driveway Approach, and 1065 Sidewalk – these are the few public works inspection types specific to building projects. Because this Building Module inspection group is a Structural inspection group, auto-assign is also Structural (if auto-assign is ON) and therefore these few inspections would auto-assign to a named Structural Inspector, not to a Public Works Inspector. Additionally, these are also the only public works inspection types a customer can self-schedule on a given Structural record type – unless explicitly PENDED by the agency, the customer cannot self-schedule any public works inspection types included in the Public Works inspection group/module on a Structural record type. Note, the many public works inspection types included in the Public Works inspection group/module are set to auto-assign (again if auto-assign is ON) specifically to a named Public Works Inspector. Please refer to the ePermitting Inspection Brochure for inspection groups and types. If you are an agency experiencing any issues related to this and need more information, please submit a helpdesk ticket to [email protected]. We will be adding a new exceptional “payment” method to the Model effective November 18th called Restore Payment. After much data analysis, it was determined that the Journal Entry payment method was being used for much more than restoring payments voided in error – it then became necessary to break the restoration of a payment voided in error out uniquely so that it could be included in the nightly financial batch where Journal Entry is excluded. This new method now requires a change in how the Journal Entry method is used – these differences are explained below.
Journal Entry: The Journal Entry payment type is will be used to reflect/record a payment that was posted or receipted outside of Accela, such as receipted to a financial software. This payment type is only used to reflect payments made outside of Accela such as with a case where you need to demonstrate that a deposit payment was made to the City/County cashier and receipted in the agency financial system directly. You would process a payment type of Journal Entry for the external payment amount - in the Payer field you will type “Journal Entry Payment” and in the Payment Comment, and as best practice, you would include a brief comment that the payment was made in an external system, the reason, the receipt number from the other system, the payment method, the date posted, and any sort of approval code or check number. This payment type effectively demonstrates that an external payment was made, and does not show up on your cash balancing but does show in the transactions applied/revenue reports as a result of a payment method being applied to fee items in Accela. The Transactions Applied by Method would show this type of transaction clearly as would the standard Revenue Exceptions Report. Important note: You cannot process a refund on this payment type as it is just a reflection of a payment made outside of Accela, the payment would have to be refunded in the external system it was posted in. Restore Payment: The new Restore Payment payment type will be used to restore a payment transaction to a record where the payment was voided in error. This payment is only used to restore payments voided in error as the monies were already deposited on a prior date/year/fiscal cycle such as with a 6-month old payment that was accidentally voided today. You would process a payment type of Restore Payment for the voided payment amount – in the Payer field you will type “Restore Payment” and in the Payment Comment, as best practice, you would include a brief comment that a payment was voided in error and is only being restored, and reference information to the original ‘voided’ payment such as original receipt #, payment method, payor, and original posting date. This payment type effectively restores the original payment transaction, although on current date, and does not show up on your cash balancing but does show in the transactions applied/revenue reports as a result of a payment method being applied to fee items in Accela. The Transactions Applied by Method would show this type of transaction clearly as would the standard Revenue Exceptions Report. Important note: Restore Payment should only be used to restore ‘Cash’, ‘Check’, ’Credit Card’, ‘Fund Transfer’, ‘Internal Transfer’ and ‘Refund Check’ payment types. Using it to restore other exceptional payment types to include ‘Credit Memo’, ‘Fee Waiver’, ‘Write Off’ and ‘Billed’ will not appear correctly on reports and cause financial issues. You cannot process a refund on this payment type as no cash was currently exchanged/paid – you are only restoring the transactional payment record. To refresh on the other available Exceptional Payment Types, check out the Knowledgebase article Payment Processing Cases and Types. What are the limitations in naming sets? Because set names are stored in the database and these names are used to retrieve information about the sets, special characters like ‘&’, ‘%’, ‘-‘, ‘()’, single quotes (‘) and double quotes (“) should not be used. These characters have special meaning in the programming languages used to develop reports. When these special characters are used, the reports will often fail. Please take note the next time you are creating a new set in the system.
It’s helpful for Inspectors and Building Officials to understand what inspection results mean, what they do in ePermitting, and how they are being counted in data reports. The following chart and definitions may be useful in understanding the functions of inspection results. 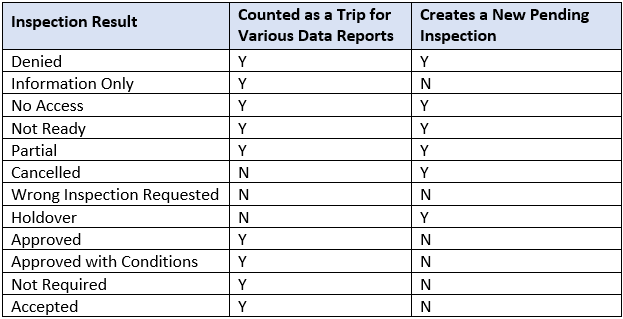
The ability to use smart devices to result inspections via the Accela Inspector App is a great tool but it can be frustrating when working in locations with little to no cellular service for the devices. Fortunately, you don't need cellular service or even a Wi-Fi connection to result the inspection, look at record details, or even send a summary report to a customer.
Below are instructions on how to first refresh your system data and second, set the Accela Inspector App to download offline jobs. Before leaving the office or area with a Wi-Fi or cellular connection, do the following: Setup Accela Inspector App in Offline Mode Once you have completed these steps you will be able to access all of the inspection and record information needed to complete your inspection. Please note that you will need to keep the Inspector App open on your device and remain logged in. If you close or log out of the app it will require you to log back in, which won't be possible without either cellular or Wi-Fi service. Note: After completing the above steps test the app to see if it will work by going to the settings on your smart device and switching the device into Airplane Mode. This will disconnect all cellular and Wi-Fi to your phone. Next, navigate back to the app and select an inspection from your job list. From there select "details" and then "view record." When the record/permit opens you should be able see all of the information. For assistance please contact Jerod Broadfoot at [email protected] or via mobile at 541-240-1256. The Inspection Log is available as a function in the Inspection List page. This function is very helpful in answering questions about inspection scheduling – who, what, where, and when. Go to the Inspections List page > check the checkbox for the inspection you are needing log details for (can only select one) > select the View Log button > select Inspection Log.  A pop-up window loads, edit the Log Date fields if you need to look beyond the one-month default period – often going back to the date the record was created is most ideal (this date is available in Description of Work as “Opened Date” or on the Record List as “Opened” date) – then select Filter to get log results/complete history for that selected inspection.
Note the different log detail information that provided for the selected inspection. This includes the following:
All of this detail data can be very helpful in determining who ‘changed’ an inspection in any way, including assignment and any other important edits that may have affected your daily schedule or been contrary to your scheduling policy/practices. If you are unable to run the Inspection Log or need assistance interpreting this data, please contact our help desk at 503-373-7396. |
DisclaimerPlease be aware that this content is relevant at the time it is published, but as time goes on may become out-of-date. We will do our best to keep the content alive and relevant. Archives
June 2024
Categories
All
|
 RSS Feed