|
Did you know that the Expiration Dates of related Building records will always be synced? This was an enhancement that was released in the model in February 2015. This means that if any related record, including a parent, grandparent, child, or sibling, has an update to it’s Expiration Date all other related records’ Expiration Date will also be updated.
There are a handful of exceptions where the Expiration Date will NOT be updated from a related record:
Record Expiration Dates are automatically updated in the following scenarios:
0 Comments
Traditional
Making “child” records in ePermitting is a way of copying and joining records that logically go together. In the most traditional case , child records are records that are related to or part of a larger overall project – the parent record is for example the Structural permit and the child records are the Electrical, Mechanical, and Plumbing permits– these trade records have the same address, parcel and owner as the parent record and are part of the same project. By making them child records, they get the same permit number as the structural permit, with a “01” appended to show that they are child records; however, the trade permits could be issued separately, as standalone permits, and related after the fact to tie them together. Records that can only be “child records” There are some child records, however, that can never be standalone permits, – these are Revision, Deferred Submittal, and Structural Phased. These three record types are plan-review only records and will never become permits. These child-only record types allow you to document an exceptional plan review process as – to review a secondary/revised set of plans [Revision], to review a deferred portion of the structural plan [Deferred Submittal], or to review the plans limited to only a phase of the construction and authorize work to begin on only that phase [Structural Phased]. Records that should never be “child records” Some record types should never be child records - those are 1 & 2 Family Dwelling, Manufactured and RV Park, and Manufactured Dwellings. Because these records are for complete projects with complex underlying forms, they should never be made as child records (or unrelated cloned records), except from the exact same type of record. So you can clone or make a child of a Manufactured Dwelling Record ONLY from a Manufactured Dwelling record. If you try to clone an Electrical record to make a Manufactured Dwelling record your permit for the Manufactured Dwelling will never work correctly because it will not have access to some of the Manufactured Dwelling required fields. If you have further questions/concerns about whether a record should be a child record, please submit a helpdesk inquiry to epermitshelp.BCD@oregon.gov. Credit Memo: this non-cash exceptional payment type is used when your agency is going to provide the customer with some form of discount. It is used case by case at the individual record level – i.e., you lost the customer’s plans somehow, so now you need to request additional copies and plan review will take one week longer – in this case, you agree to provide them with a 30 percent discount on their plan review fees. This exceptional payment type reduces the amount owed by effectively “paying down” the outstanding balance by the amount of the discount.
Fee Waiver: This non-cash exceptional payment type is used when your agency has a policy for waiving fees in certain defined cases such as not charging Habitat for Humanity or only charging 50 percent of permit fee when a home in your Wildfire Hazard Zone is being rebuilt after fire. This exceptional payment type also reduces the amount owed by “paying down” the outstanding balance by the amount defined in your policy. Journal Entry: The Journal Entry payment type is used to reflect/record a payment that was posted or receipted outside of Accela, such as receipted to a financial software. This payment type is only used to reflect payments made outside of Accela such as with a case where you need to demonstrate that a deposit payment was made to the City/County cashier and receipted in the agency financial system directly. You would process a payment type of Journal Entry for the external payment amount - in the Payer field you will type “Journal Entry Payment” and in the Payment Comment, and as best practice, you would include a brief comment that the payment was made in an external system, the reason, the receipt number from the other system, the payment method, the date posted, and any sort of approval code or check number. This payment type effectively demonstrates that an external payment was made, and does not show up on your cash balancing and revenue reports as a result of it not being revenue posted in Accela. Important note: You cannot process a refund on this payment type as it is just a reflection of a payment made outside of Accela, the payment would have to be refunded in the external system it was posted in. Restore Payment: The Restore Payment payment type is used to restore a payment transaction to a record where the payment was voided in error. This payment is only used to restore payments voided in error as the monies were already deposited on a prior date/year/fiscal cycle such as with a 6-month old payment that was accidentally voided today. You would process a payment type of Restore Payment for the voided payment amount – in the Payer field you will type “Restore Payment” and in the Payment Comment, as best practice, you would include a brief comment that a payment was voided in error and is only being restored, and reference information to the original ‘voided’ payment including original receipt #, payment method, payor, and original posting date. This payment type effectively restores the original payment, although on current date, and does not show up on your cash balancing and revenue reports as a result of it not being “new” or current revenue. Important note: Restore Payment should only be used to restore ‘Cash’, ‘Check’, ’Credit Card’, ‘Fund Transfer’, ‘Internal Transfer’ and ‘Refund Check’ payment types. Using it to restore other exceptional payment types to include ‘Credit Memo’, ‘Fee Waiver’, ‘Write Off’ and ‘Billed’ will not appear correctly on reports and cause financial issues. Billed: details about this payment type are outlined in the article “How to Use the ‘Billed’ Payment Method” on Page 3. Additionally, this exceptional payment type requires the agency to track these closely and re-invoice the customer up and until the fee is actually paid. Generally there is a due date given in these cases. Permits should never go to Final with a Billed payment type still active – this would mean your agency never received actual revenue/cash payment for the completed work. None of these exceptional payment types appear in your nightly batch as they are not actual revenue, not money, therefore they are not included in any balancing reports since they are not CASH. On this note, it is important to always be cautious to never incidentally refund any of these as they were never money. There is a dedicated report for monitoring these called “Revenue Exceptions” – this should be run weekly at a minimum to be sure these are being applied as per business rules and resolved as in the case of Billed payments. If you have further questions on how to use these or when, please submit a ticket to epermitshelp.BCD@oregon.gov. The ‘Billed’ payment method was created to allow the agency to indicate that the customer will receive an invoice or bill and the permit will be allowed to advance through the workflow regardless of when actual funds are received. This is the decision of the issuing agency and the responsibility to track of the issuing agency.
If the building department receives payments for the bills or billed invoices, when the CASH (cash/check/credit card) payment is received, the ‘Billed’ payment should be voided and the new payment having a payment method of ‘Cash’, ‘Check’, or ‘Credit Card’ should be recorded and applied to the fees that were previously billed. Using ‘Cash’, ‘Check’, or ‘Credit Card’ will enable the deposit slip or payments received reports to match the actual funds taken in as well as enabling the payment applied information to be included in the nightly Financial Batch. The ‘Billed’ payment method is NOT included in State Surcharge reporting. Only CASH payments are included in the State Surcharge reporting, therefore it is imperative that the agency follow through with collection of CASH payment prior to final or closing the record. If the finance or treasurer’s department receives payments for the bills or billed invoices and records the payment in a separate system from ePermitting, once the building department is notified that payment has been received, building department staff should void the ‘Billed’ payment in ePermitting and record the payment made through the other system (department) using the ‘Journal Entry’ payment method. Using the ‘Journal Entry’ payment method does not affect the nightly Financial Batch, the Deposit Slip or Payments Received reports. Over the years as we support and add agencies, we have seen all kinds of documents attached to records, from one document to more than a 100+ documents – how you manage all of these documents over the life of the record is very important. Many of the documents that auto-save to the Documents tab on records are considered part of the ‘official’ record.
Some of these auto-saved documents include the Receipt, Invoice, Permit, Temporary Certificate of Occupancy (TCO), and Certificate of Occupancy (C of O). As each of these documents is generated thru a process, sometimes we discover that we missed filling in necessary or required information, forgot to update an address or owner, didn’t edit the Description of Work, etc. Once fixed - particularly for the Permit, TCO, C of O, and CSC - you regenerate the report then from the Record Summary > Reports dropdown. After doing this, it is very important to delete the former incomplete/incorrect copy from Documents given you have now generated a new corrected copy – ideally there should only be one ‘official’ Permit, C of O or CSC, on any given record. Keep in mind that the customer can see Documents on their records thru ACA and when there are multiples of the Permit or other important document – this poses the risk of them pulling an incorrect or inaccurate version of this important document. When you need to see the Receipt or the Invoice once it’s been generated, go to Documents, locate the document, Actions > Preview. If you go to the Receipt # in the Payments screen or the Invoice # in the Fees screen, and click the link to see them, you are generating another copy of these same documents which could result in multiple copies of the same receipt/invoice in Documents over time. Keep in mind that the receipt is a living document, it will change when any fee included in a particular receipt # is changed such as voiding a paid fee – in this case, generating a new copy of the changed receipt would be necessary. Any documents that are in PDF format can be viewed thru Preview, however other document types will have to be downloaded first thru the Actions menu and viewed in the source application. For all these reasons and more, good housekeeping of your record documents is a good habit to get into. General Program overview: the Electrical Master Permit Program allows covered/qualifying facilities OAR 918-309-0100 (b) to pull an annual permit which allows “repair, alteration or replacement of existing electrical products” – please review what is allowed under this permit and what is not at OAR 918-309-0100 (4). A roster of all current electricians, their license # and type, must be filed at the time of application. The applicant/facility must keep records of all electrical work done – the person doing the work and their electrical license #, and date of work – this record must be available to the jurisdiction inspector at the time of annual inspection.
ePermitting Process: 1. Commercial Electrical application is initiated:
We receive questions about Certificate of Occupancy (C of O) regularly from agencies, so thought we would shed some light on this report and the Certificate of Satisfactory Completion (CSC) and when these would generally be used.
In Accela, the C of O is available thru Workflow on Structural records as this record type is where occupancy is granted for new or added square footage, changes in use/occupancy, and tenant improvements (TI’s). Outside of being generated thru Workflow, the C of O report is also available to be run manually once Workflow is closed thru the Reports dropdown in the Record Summary on building records and thru the Launchpad on the Building Reports page. However, if you are attempting to generate a C of O on a record type that it is not indicated for/not generally required for, the report will run but will be largely blank. To answer a recent agency question, C of O is not required on Manufactured Dwelling placements/sitings (MFD record type), occupancy is typically granted on these at the factory – however, alteration/remodel of an existing Manufactured Dwelling may require change of use/occupancy or additional square footage and therefore is handled thru a Structural record type in Accela where the C of O is available if needed [Category of Construction = Manufactured Dwelling, Type of Work = Alteration]. Consult your Building Official for all decisions related to granting occupancy. The CSC report is an available report that formalizes the final inspection and overall completion of a construction project, any discipline, where occupancy may not need to be granted such as for Electrical, Mechanical, Plumbing, many Structural Alterations, etc. This report is not available thru Workflow so must be manually run from the Reports dropdown in Record Summary on building records or thru the Launchpad on the Building Reports page. This report is often requested now by banks/lenders at the time construction loans are funded or completed, Homeowners, Real Estate agents at the time of sale, etc. Note, these two reports may not run successfully on converted records due to missing yet required data elements, check all tabs in Record Navigation to check for and complete required fields. If you have any questions on how to run one of these two reports, contact the helpdesk at 503-373-7396 or submit a helpdesk ticket to epermitshelp.BCD@oregon.gov. We’ve recently received some customer calls inquiring about why the permit valuation in Accela does not match what they indicated on their application. Recorded valuation is used on a majority of Building Reports and often shared with the local Tax Assessor who then reviews this information to determine whether a new appraisal is needed to re-evaluate property taxes. And where valuation is used to calculate permit fees, it’s important to note that Accela will impose your minimum structural permit fee regardless of the valuation entered and will otherwise accurately calculate the exact permit fee as per your permit fee table. Example, your minimum structural permit fee is $85 for valuation range $1 - $2000 – you do not need to input a job value of $2000 to make sure you get your minimum structural permit fee – you could enter only the $500 submitted job valuation and the system will still impose your minimum structural permit fee of $85. Any dollar valuation in that first range and/or up to the calculation that meets your minimum permit fee will be imposed by Accela automatically – so you do not need to adjust the submitted job value to make sure your minimum permit fee is assessed. The customer in our example was contacted for a possible appraisal but they had in fact not done an improvement valued at $2000 so they had to request a copy of their application from the agency and a copy of their contract with the licensed professional to show the lower valuation/improvement value.
If you have any questions about permit fee calculations, use of Contractor or Calculator Valuation, please submit a helpdesk ticket to epermitshelp.BCD@oregon.gov for assistance. Deferred plan review is when a project submittal is incomplete at intake and one of the portions of the overall structural building design is allowed to be submitted separately. This does not apply to deferred permits in the Model such as Electrical, Mechanical, Plumbing, or Fire – deferral is only currently available on structural. A common type of deferral is engineered trusses – since these are being designed and drawn up by a separate party, the truss pages are not included in the initial plan submittal. The customer is deferring the plan review on these missing pages; however the plans examiner can begin review on the initial submittal knowing that a portion has been deferred. The Deferred plan review fee is a premium; it is in addition to standard plan review fees and covers the added cost of the agency having to go back and review the plan submittal as a whole once the deferral is submitted, this takes time. Once the deferral is submitted, a brand NEW record is started from the Launchpad or Record List – take note of the parent submittal record number, as you will need this number to intake the deferral. Select Commercial or Residential, then Deferred Submittal from the record picker and the intake will pop up.
There is a specific note included about the Job Value at intake, to enter only the value of the deferred portion of the project. Important to note that the valuation of the deferral should not be omitted from the parent record valuation for the purpose of permit and standard plan review fee calculation, the parent record should be the total project valuation including the value of the deferral. The deferred record will not assess a permit fee as it is not a permit record; it is a plan-review-only record type and simply allows you to track the plan review effort on the deferred portion of the submittal so will only assess the deferred plan review (premium) fee. The intake will also ask for the “Master Application #” which is the parent permit record number you jotted down. At Submit, you will have created a deferred child record to record the plan review activity on the deferred plans portion – follow this record through workflow to completion. Unlike phased plan review, no work can begin on the project up and until the deferral is reviewed and approved. If you have any questions or issues creating or managing structural deferrals, please contact our helpdesk at 503-373-7396 or submit a helpdesk ticket to epermitshelp.BCD@oregon.gov. We are in the final leg of removing all generic users from our ePermitting agencies. These users were named things like “FrontCounter” and “Intake” – they are no longer being allowed in the Model as they are not audit worthy. They provide no individual accountability to any one user and tend to be users that take and process payments, assess fees, issues permits, and more. All of these activities, especially the handling and processing of money, require a greater level of tracking and accountability for audit purposes that a generic user login simply does not provide. These generic users open up a loophole of risk for agencies so are being disabled and no longer being provided.
Note, you can be logged in multiple times with Accela since it is web-based – you could be logged in at the front counter and at your desk, and can actively use both instances. If more than one user is covering a front counter, you both could log in on the same front counter computer, just under separate browsing sessions (not tabs) – and be left open for when you are covering the counter. If you have any questions about best practice and logging in to Accela in more than one location, please contact our help desk at 503-373-7396 for guidance. We all have likely had the experience of something being Issued too soon in Accela Workflow or the wrong plan review task was Approved, etc. The solution for correcting these types of errors is to Supervise in to Workflow and reset it.
To do this, you would go to Workflow in the Navigation Pane > select the Supervisor button – this will drop you into Supervisor mode. Only certain user groups have access to Supervise in to Workflow so if you do not see a Supervisor button displayed, it is likely that your user group is not sufficient to perform this correction. The red task in this view is the active task, open this task by selecting it – a set of task options will then be displayed. Task Active? Should be reset to NO because we no longer want this task to be the active task; Task Completed? Should also be set to NO as well since we will be coming back to reprocess this task again in the future – Due and Assign Date will now be required, input today’s date, then Submit – these steps will deactivate the active task since it was processed prematurely. While still in Supervisor mode, now select the task where the record should actually be and was before the error was made – repeat the above steps where Task Active? Should be YES because we now need to reactivate this particular task; Task Completed? Should be NO because we now need to reprocess this task as before to reset the workflow status to where it was before the error was made. We are now done in Supervisor mode, so select Cancel to return to Workflow. Now result the reactivated task as it was before – if you are unsure what the result was previously, go to Workflow History in the Navigation Pane and review the entries by date and task to determine this. The final step in resetting Workflow and correcting a record in this way is to also reset the Record Status. Go to Record Status in the Navigation Pane, and through the dropdown manually back up the record status to where it was before the error was made – if you are unsure what specific status it was in, go to Application History in the Navigation Pane and review the entries by date to determine this. Once determined, return to Record Status and reset the status accordingly. This is one of the very few exceptions where you should ever be manually setting Record Status – the Workflow should always drive the record status as required tasks are completed. A mismatch in Record Status and Workflow Status will cause other reporting and display issues, and sometimes result in a record status that is not even associated to that record type which can incidentally exclude records from various filters and reports. If the record was issued prematurely in particular, you will need to also go to Description of Work and delete the date from Issue Date and delete the Issued Permit document from Documents. To meet the needs of agencies that use multiple modules and offices, financial reports are getting a facelift. Over the next few months, new versions of the financial reports will become available. Before beginning a new report installation, an email will be sent to all agencies explaining the changes. However, there may be lag time between email and installation because the epermitting team must individually change report settings in each agency.
The following daily balancing reports will have versions that allow the user to run the report for all, one, or several modules or offices. In some cases the reports may be run by payment method and cashier too. The heading on these reports has changed as well – the agency contact information has been replaced with the name, phone, and email for the user running the report.
There are also some new, or modified, special use financial reports: Fees by Account
The financial transaction reports will also be changed. Each of these reports, except the Set Receipt, will have contact information in the header that matches the record’s module or in the case of POS transactions the module that was used when the POS transaction was completed. When applicable the header also includes the office. Invoice and Grouped Invoice
Some of the financial reports used to pay others will be modified as well:
May Training Opportunity: Changing Financial Reports
The Inspection Log is available as a function in the Inspection List page. This function is very helpful in answering questions about inspection scheduling – who, what, where, and when. Go to the Inspections List page > check the checkbox for the inspection you are needing log details for (can only select one) > select the View Log button > select Inspection Log.  A pop-up window loads, edit the Log Date fields if you need to look beyond the one-month default period – often going back to the date the record was created is most ideal (this date is available in Description of Work as “Opened Date” or on the Record List as “Opened” date) – then select Filter to get log results/complete history for that selected inspection.
Note the different log detail information that provided for the selected inspection. This includes the following:
All of this detail data can be very helpful in determining who ‘changed’ an inspection in any way, including assignment and any other important edits that may have affected your daily schedule or been contrary to your scheduling policy/practices. If you are unable to run the Inspection Log or need assistance interpreting this data, please contact our help desk at 503-373-7396. The ability to use smart devices to result inspections via the Accela Inspector App is a great tool but it can be frustrating when working in locations with little to no cellular service for the devices. Fortunately, you don't need cellular service or even a Wi-Fi connection to result the inspection, look at record details, or even send a summary report to a customer.
Below are instructions on how to first refresh your system data and second, set the Accela Inspector App to download offline jobs. Before leaving the office or area with a Wi-Fi or cellular connection, do the following: Setup Accela Inspector App in Offline Mode Once you have completed these steps you will be able to access all of the inspection and record information needed to complete your inspection. Please note that you will need to keep the Inspector App open on your device and remain logged in. If you close or log out of the app it will require you to log back in, which won't be possible without either cellular or Wi-Fi service. Note: After completing the above steps test the app to see if it will work by going to the settings on your smart device and switching the device into Airplane Mode. This will disconnect all cellular and Wi-Fi to your phone. Next, navigate back to the app and select an inspection from your job list. From there select "details" and then "view record." When the record/permit opens you should be able see all of the information. For assistance please contact Jerod Broadfoot at jerod.a.broadfoot@oregon.gov or via mobile at 541-240-1256. Deferred Plan Review – the option of deferring portions of a building design (structural elements) and allowing it to be submitted later. Must be declared up front at intake on the parent as to what portions are being deferred. Not until all the deferred plan portions are submitted and approved, can the parent permit be issued and work commenced. Does not apply to deferred standalone permits such as the trades Electrical, Mechanical, Plumbing, or Fire. Examples of deferred plan review include engineered trusses, engineered stairwell, elevator shaft, etc.
You create the parent record as a standard Structural record type to include the total project valuation – the declared deferrals are recorded in the Comments (Internal) on this record as informational. As the deferred plans start to come in, you create a new record, Commercial or Residential, as the Deferred Submittal record type. It’s important to note the parent Structural record ID before creating the Deferred Submittal child record as this is required to generate the new record. At intake, you record the value of the deferred portion only (not the total project value) and the “Master Application #” which is the parent record ID. The Deferred Submittal workflow only includes plan review tasks – it is not a permit, it provides a clean way to track the plan review of the deferred submittal separate from the initial plan submittal reviewed on the parent record. The Deferred Submittal plan review record automates the Deferred Submittal fee only – this fee is in addition to standard plan review fees that are collected on the parent record, and is a premium collected for the added plan review effort and coordination required when plans are submitted in portions/not as a complete full plan set, therefore the customer is not ‘paying standard plan review fees twice on the same valuation’ which is a common misconception. No permit or standard plan review fees, or inspections occur on the Deferred Submittal record type. Other plan review only record types include: Phased Plan Review – the process of allowing structural construction to begin on a portion or portions of a building before the construction documents for the whole building have been submitted. Phased plan review must be declared at intake for the total project – each phase submitted is subsequently reviewed and upon approval, an authorization to begin work on only that reviewed portion is provided. The key difference from Deferred Plan Review is that work cannot begin with Deferred up and until all the deferred plan portions are submitted and approved – whereas with Phased, authorized work can commence on each reviewed portion (phase) as plans are approved. Revision – is invoked when there is a request for a material change in the submitted plans for a project – either by the Applicant or the Agency – and occurs most commonly at application during plan review, or less commonly post-issuance at issuance/inspection. A revision requires additional plan review and approval before commencing with any work included on the revised plan and often times before allowing any continued work on the original plan. In ePermitting, when you add fees to a permit the fee schedule always defaults to the schedule for the type of permit you are working on and the most recently installed fees. The valuation calculator also defaults to the most recent version of the adopted ICC valuation table. Sometimes, however, you need to assess fees from an older fee schedule or valuation table (e.g., when a permit was opened before the adoption of the new schedule/valuation table and you need to honor the old rates even though there’s a new rate in effect). Please note that valuation must be based on ICC building valuation data, current as of April 1 of each year (OAR 918-050-0100 (1)(c) and (2)(c)). To do this you should NOT use a ledger adjustment to get the “correct fees,” you should, instead, use the older fee schedule or valuation table to calculate or assess the fees. On a One & Two Family Dwelling permit, ePermitting defaults to the Structural Residential fee schedule and the most recently adopted schedule: 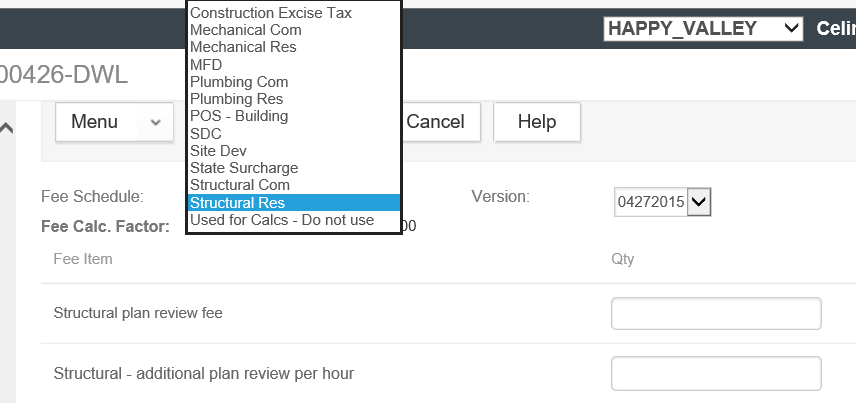 If you need to toggle back to an older version of the fee schedule, just pick it from the Version drop down and add the fees at that rate: 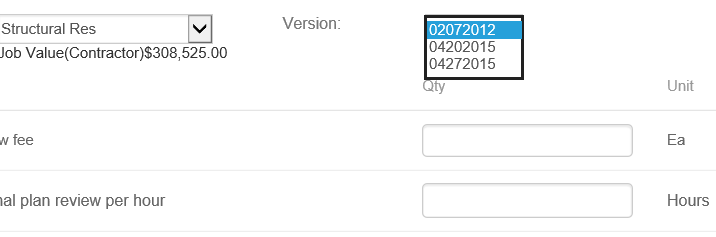 If you need an older version of the ICC tables you change to the desired schedule on the valuation calculator and use that value to recalculate the fees: 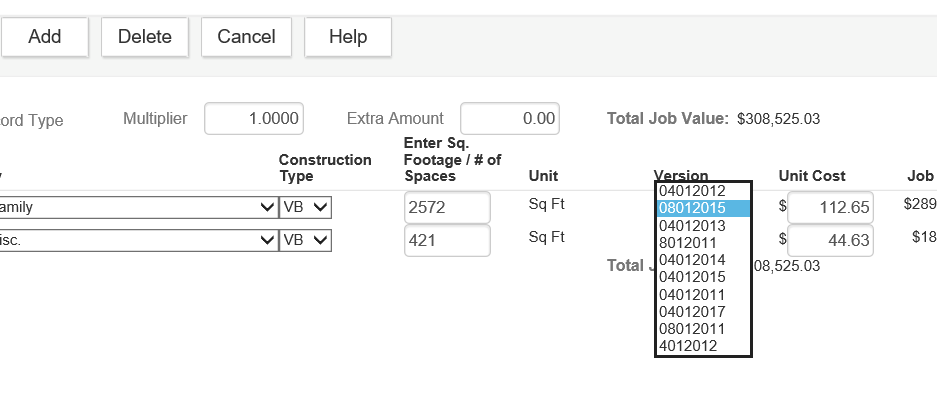 Using the fee schedules or the valuation tables is preferable to using a ledger adjustment because it better reflects what you are actually charging the customer and why.
The ePermitting system has been designed to accommodate when the Owner is acting as their own contractor and doing their own work. When creating a new application or editing an existing record, go to Professionals > do a Look Up or Search for License Type = Owner (Property): 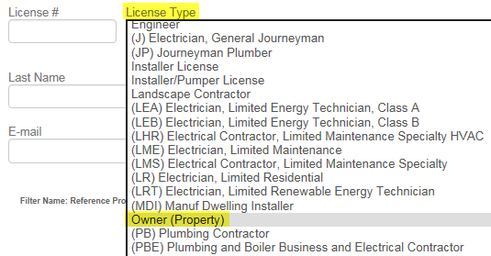 This information is then pulled into the Building Permit report into the Licensed Professional Information section with the following reference, “SEE PROPERTY OWNER INFORMATION”. In Workflow, Permit Issuance task there is an optional task related information (TSI) as a tickler for this requirement:  Further along in Workflow, Certificate of Occupancy task there are required TSI for confirming if the Owner did any portion of the work, and if so, if the Owner Affidavit is on file - see CCB link below for the required form in this case. 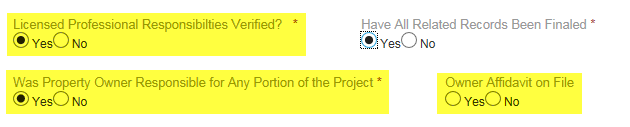 For reference, ORS citation regarding when this would be required:
https://www.oregonlaws.org/ors/701.325 CCB Notice to Property Owners about Construction Responsibilities/Owner Affidavit form: http://www.oregon.gov/CCB/Documents/pdf/property_owner%20adopted.pdf We recently rolled out an enhancement to all workflows in our OSM modules called, “Workflow Emails” that allows an agency to communicate through email to both internal staff and external recipients. This is especially useful for emailing internal staff, that don’t log in often, to let them know that they have a review task to complete; or, to provide external departments or stakeholders with notice that a permit has been issued or a task has been completed. To email internal staff , simply select the new workflow task status, select the staff name from the Department dropdowns, enter task comments as the body of your email, and click Submit; if you need to select more than one staff from the same department, enter their email address in the “Other Email” field and separate multiples with a semicolon ( ; ). To email external recipients, simply select the new task status, select the recipient from the External Recipient dropdown, enter task comments as the body of your email, and click Submit. To populate this dropdown with email addresses, please send an email with a list of the external recipients and their email addresses to ePermitsHelp.BCD@oregon.gov. ePermitting staff will then populate the external recipient email addresses for you. You can review all the details (with screenshots!) on how the workflow emails work in this Kayako Knowledgebase article:
http://orepermittinghelp.kayako.com/Knowledgebase/Article/View/99/0/workflow-emailcommunication-enhancement Why doesn’t the permit count on the State Surcharge Report match the State Data Request count?1/2/2018 State Surcharge report: Permits get counted on this report when permit fees (not surcharge fees) are paid, voided, or refunded. Permit types like the 1 & 2 Family Dwelling may have permit fees in each of the Structural, Mechanical, Electrical, and Plumbing categories; a permit fee assessed in a category will count as 1 permit (so you may have 4 “permits” counted for a single 1 & 2 Family Dwelling permit). Each permit fee category that has a positive fee total counts as 1 permit in the permit count, while negative fee totals (caused by refunds or voids) count as -1 in the permit count. In other words, if you take a permit payment in one month it will count as 1 permit and if you refund that same permit payment six months later it will count as -1 on your next report. Also, if you take partial permit payments each payment will count as a permit fee paid, so your permit count will be too high for each extra permit payment you record.
Building Data Request report: This report looks for permits that have the status of “permit issued,” that also have a paid surcharge fee (looking for the surcharge fee weeds out the permits, like demolition permits, that are not covered by the building code and thus should not be included in the building data report). In summary, the big differences between the reports:
Given all of this, when the mechanical, structural, plumbing, and electrical permit counts on the State Surcharge report are totaled for an entire year, the count is likely to be slightly higher than the permits issued count on the Building Data report for the entire year. As you may recall in October, ePermitting sent out a survey to see how many agencies would like to have the Record Search Page updated to allow the record number field to be the first field on the page moving the street number field to a new location and allowing users to type in the record number without the curser jumping to the street number field once the page continued to load. 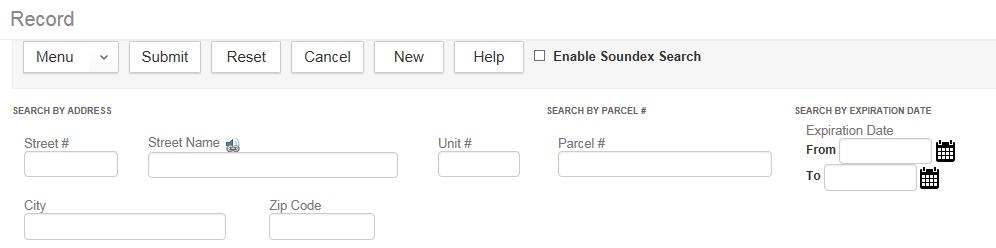 We were very excited to provide an opportunity to let our agencies decide if the street number or record number field should go first on the page and wanted to say a big “Thank You” to those of you that placed a vote! Out of 34 votes it was an even split between those that wanted the change and those that didn’t and after some discussion as a team we have decided to leave the Record Search Page how it is to keep up with best practice searches and we wanted to provide some information to explain why Searching by Address in the Record List as Best Practice.
Because customers can apply for permits in Accela thru ACA online (Accela Customer Access) or over the counter in your office – it can be difficult sometimes to group various permits together that are all working on the same one project. The general contractor may come in and pull the Structural Permit over the counter but the trades contractors purchase their Electrical, Mechanical, and Plumbing permits through ACA online. In this very common scenario where the various contractors purchase their permits through different avenues and at different points in time but all are for the same one building project – searching by address always first will help agencies to quickly and visibly identify permits related to the same project that should ultimately be related as a group. Relating records has it’s definite advantages – expiration dates across all the related records will synch up to the most recent inspection plus 180 days regardless of what permit it occurred on within the related record group – and – Certificates of Occupancy require these related groups so that an agency can easily determine whether all permits are completed on a project as a whole prior to granting occupancy. Related record groups can span modules as well to include Public Works, Planning, and/or Onsite records that ultimately relate to the project for approvals or in sequence of completion, ie. perhaps Onsite and Public Works Driveway/Site Prep has to be done before work on the structural dwelling can begin, etc. For these reasons, searching by address first then ultimately becomes best practice in helping agencies to relate permits associated to the same project. Conditions of Approval
In all other cases, careful consideration should be taken on whether a permit-specific condition should be added as a Condition of Approval or as a Condition (Standard) applied to the Record based on the intent of the condition. If it is necessary to stop progress/activity on the specific record, then it should be added as a Condition (Standard) with severity of Hold or Lock to prevent payment processing or inspection scheduling – if it should only serve as a requirement at project completion, then it should likely be added as a Condition of Approval, keeping in mind the above “Important Note”. We have considered adding fees incrementally but decided that overall it is better not to because:
|
DisclaimerPlease be aware that this content is relevant at the time it is published, but as time goes on may become out-of-date. We will do our best to keep the content alive and relevant. Archives
August 2023
Categories
All
|
 RSS Feed